Wednesday, April 29, 2009

Welcome to the Blog Hop

Get ready for some Blog Hopping fun. There are over 40 Close to my Heart consultants celebrating the upcoming release of the Summer 2009 Idea Book by sharing their wonderful creations using new products via their blogs. So here is how this works: just click on the link at the bottom of this post then each blog will have a link to another blog until you are back to mine.


I just love these Flip Flaps, I was able to put seven pictures in the space of one with these. They are attached on top of the page protector with hinges. A slit was made to insert the adhesive strip under the base picture and is attached to the layout. The brads are attached the hinges go all the way trough to the back of the layout. Therefor the page cannot come out of the page protector.


Back Country paper pack and Campin' Fever stamp set were used along with the new Memory Protectors Flip Flaps which debuted in CTMH Summer 2009 Idea Book. Other items used were Rustic and Chocolate Alphabet sets, twill, edge anchors (colonial white used then embossed with outdoor denim embossing powder and then sanded),white hemp,dimensional elements in color adventure chipboard pieces, hinges, edge distresser, sandpaper, piercing tool, liquid glass and the inks used were chocolate, barn red, and crystal blue.

Happy blog hopping, now off to http://www.tazzygirl2000.blogspot.com/

You Scream I Scream We all Scream for Ice Cream


For those of you who do not know my daughter I just have to let you know she takes after me and loves ice cream. This was the first of many times I caught her helping herself to ice cream at the age of two. See our freezer is on the bottom so it is very easy for her to get to it.

I used CTMH notebook paper for this layout and the tags are done with June's stamp of the month Tender Tags. The ribbon was died with CTMH Crystal blue re-inker and the ice cream cone was made from Desert Sand. I used my paper trimmer, dry embossing stylus and sandpaper. To make the lines you will line up your paper with the grove in your paper trimmer and run you stylus down the grove keep repeating this until you have all of your lines. You will do this vertically and horizontally, I did this at a diagonal on the paper. Once finished turn the paper over to the side with the raised lines and lightly sand, this technique will only work with paper with a white core.

Join me tomorrow for a Blog Hop of artwork using products from the new Close to My Heart Idea book.

Monday, April 27, 2009

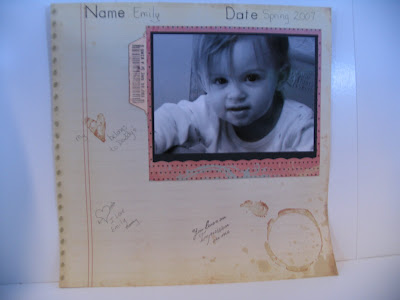
Notebook


For both of these I used CTMH Notebook line of papers. The layout Coffee Stain, Code It, and Classmate Alphabet stamp sets were used. For the card I used Shining Star with the chalk popping technique. To due this stamp the image with Versa Mark then color your areas with chalk, just that simple.

Friday, April 24, 2009

Baseball Season is Here


I thought I would post this in honor of baseball season being here. I used CTMH Game On paper, though the grey background paper was made from CTMH All Star stampset. I placed all of the phrases on one large block and stamped the image over and over but each time I turned the block a different direction. The image of the baseball player and the phrase baseball was stamped with the black Versa Pad on the inside of a pop can. Yes, I said pop can, just cut off the top and bottom then cut down one side. This piece now needs to be iron flat. Taking the aluminum between a towel iron over it till it is flat.

Wednesday, April 15, 2009

Our little Cinderella


I hate to say but I did not use much CTMH products on this one. I used some chocolate cardstock and ink along with the flower are CTMH items but the rest is from many companies. The die cut was from a Cricut cartridge and thank you Bethany for the use of it. I had seen a layout similar to this awhile ago and knew I had already taken the perfect pictures for it I just need the Cinderella. I am sorry but I do not know who to give credit to for the inspiration I just know it was a fellow CTMH consultant.

Tickeled Pink


Check out Close To My Heart's new promotion and contest. Click on the button at the right to take you to the website which gives you all of the information.

Friday, April 10, 2009

World's Best Dad


Sorry, Dad if you are reading this post it is not about you, even though you are the worlds best DAD. This card was what my club members made last night and we used CTMH Worlds Best Dad stamp set and it is also this months stamp of the month, so you have till the end of this month to purchase it. I would like to thank Cibele Glazer for the inspiration of the first card which is a stair step card. To create this card take a piece of cardstock 6X12 and you will need to score it at the one, two, four, six, and nine inches, then fold it so it looks like the second picture. Twilight cardstock was used for the water and the grass was Garden Green ink sponged on to the card. The fish were colored with Garden Green and Blush using a water brush, do not miss the googly eye on them. For the World's Best Dad sign I used my Spellbinders die.

Thursday, April 9, 2009

Be Yourself


When I saw this stamp set I immediately thought of my daughter. I had this layout in my head now for over a week and just got around to making it Tuesday night. The women are stamped on the bottom and embossed with CTMH Be Yourself stamp set. If you like this set it will me the May's stamp of the month, and you will only be able to purchase it that month. I used pink carnation paper which has been discontinued and the punch is a new one of EK Success's.

Sunday, April 5, 2009

Silhouette


All of these I have used Silhouette and Silhouette Creative Basics from Close to My Heart. To create the paper from the top layout you need to mist the paper with water and then wad it up, unfold it then take you stamp pads and rub it across the raised lines. I used Chocolate, White Daisy and Brown Bag inks. I then used an iron to flatten the paper back out. The creamy brown color on the paper was made from our chocolate reinker mixed with white paint. I then brushed the paint onto a two ply paper towel which I had separated and the raised portion of the print was what I painted. Turn paper towel over and light rub it on your paper this will transfer the design from the paper towel. I used Make It Count stamp set and for the clock I used Staz On ink on plastic (The plastic was actually from off of a box one of my kids toys came in, though I would say it probably is not acid free). The ribbon was twill which I used black ink and the saying from the stamp set, but I only inked one line at a time.

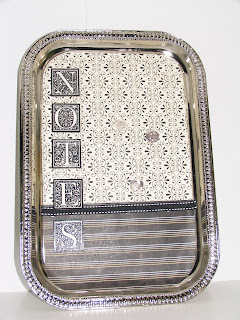
The last picture I used a tray from the dollar store but a cookie sheet can be used. In the picture it is hard to see but I have three magnets on it and they stamped images with CTMH Window Charms on to of them. Notes was stamped with the Baroque Alphabet.

Wednesday, April 1, 2009

Relax


I have to admit this was not an original design I had seen this on someone else blog awhile ago. The picture does not show all of the detail in the tub, there are lines scored horizontally along the top and bottom. The bubbles are made with Liquid Applique, it puffs up when heated. Be careful you can scorch it, but that would work great if you want the toasted marshmallow look. I feel Liquid Applique is one of those under used products, maybe because so many do not know what you can do with it. So I will share some ides: you can use it to top letters to have the snow effect, icing on cupcakes, beard or hat on Santa, clouds, or just use as some dots for dimension. Do not forget you can color it with CTMH re-inkers. If you have other ideas please share. The tile floor was done using my embossing stylus, paper trimmer and sandpaper. You will have to have white core paper, place it in your paper trimmer and score a line with the stylus, using the grove where you cut your paper. Next move your paper the desired width and score again, keep repeating until all the vertical lines are done now turn paper horizontally and repeat steps. Once all lines are scored turn paper over and sand raised lines lightly. Tip make sure you score all of your lines on the same side of the paper. The towels are just a rectangle piece of paper with little cuts made along the bottom.